Beginner's Step By Step Guide for Developing Android Applications
Android is an open source operating system owned by Google
Inc, according to the android developer site, android powers hundreds of
millions of mobile devices in more than 190 countries around the world. That’s
why there are abundant of available android application in Google Play Market.
This post is a step by step guide on how to set up the tools
needed for developing android applications and we’re going to create a simple
hello world application (so unique!).
Things to do:
- Download and Install Java API for Developers
- Download Android Development Toolkit Bundle
- Download Android System Platforms and Other Tools
- Create Hello World Application
Things you must know
to develop useful android app:
- Code using Java Programming Language
- At least basic knowledge in XML
Step 1: Download and Install Java API for Developers
If you have Java API for Developers already installed in
your computer you can skip this step. Please read this page to know the
difference between Java APIs.
- Go to Oracle Download Page.
- Accept the agreement and select your machine type.
- After the file has been downloaded. Double click it to install.
Step 2: Download Android Development Toolkit Bundle
Google made it easier to set up the tools needed to develop
Android Applications by creating a bundle of those tools including eclipse and
ADT plugins.
- Visit AndroidDeveloper Get SDK Page to download Android ADT Bundle.
- After the download was completed, extract the files inside a safe directory.
- Open the folder containing the files and open the eclipse folder.
- Create a desktop shortcut for eclipse.
- Open eclipse by double clicking the short cut.
Step 3: Download Android System Platforms and Other Tools
In order to use the full functionality of the ADT, we need
to download several tools using the Android SDK Manager.
- Inside eclipse click window on the menu tab.
- Select Android SDK Manager. A window will open showing the available tools we can install.
- Check SDK tools, SDK Platform Tools, the latest API version, which in this point of time is the API 18, and at least one old API, for this we will select API 8. It is also recommended to install Android Support Library.
- Click install and accept the agreement.
- After the tools we downloaded have been installed we are now ready to create our simple hello world application.
Step 4: Create Hello World Application
In Creating a hello world application is very easy. We don’t
need to do some coding. Just do the following steps.
- Inside eclipse select File->New->Android Application Project in the menu tab.
- In the window that will pop up, provide the Application name (any name), Project name (any name related), Package name (For this accept the suggestion of adt). Then select Minimum SDK, this would be the lowest API the application can run, select API 8. For the Target SDK it is recommended to always choose the latest API, that’s why we’ve downloaded the API 18. Target SDK is the API number where you’ll going to test the application. For the Compile with select API 18 too.
- Browse the folder where you want to save your application then click next.
- Select blank activity and click next.
- Just click next for the icon.
- Provide activity name (any name related) then click finish.
- Your application has just been created. But we need an emulator first to test the application.
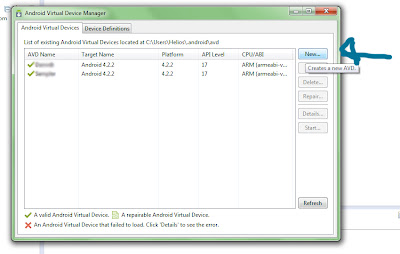
- In the menu tab click window and select Android Virtual Device Manager.
- Click new to create a new emulator.
- Provide the necessary information. The most important here is the Target SDK, select API 18 because that’s the target SDK of the application you have created. Just provide any name, and select your device type. Then click ok.
- Click the play or run button in the tool bar.
- Select Android Application.
- Wait for the Emulator to load, this would take several minutes.
- You can check its status on the console.
- Congratulations! You've just created your hello world application!
That's it, I hope you have learned something in this tutorial. Drop your comments below! Thanks!


Post some tutorials. Hihi including the coding. I will love you more. Love you CM! <3
ReplyDeleteThanks for the support! We're going to post more tutorials in the future, so i hope you'll return here to read them! cheers :)
ReplyDelete